- Amir Boroumand | Software Engineer based in Pittsburgh, PA/
- blog/
- Populate a Select Dropdown List using JSON/
Populate a Select Dropdown List using JSON

Overview #
A common requirement when developing forms on the web is populating a dropdown list using data from a web service or external file.
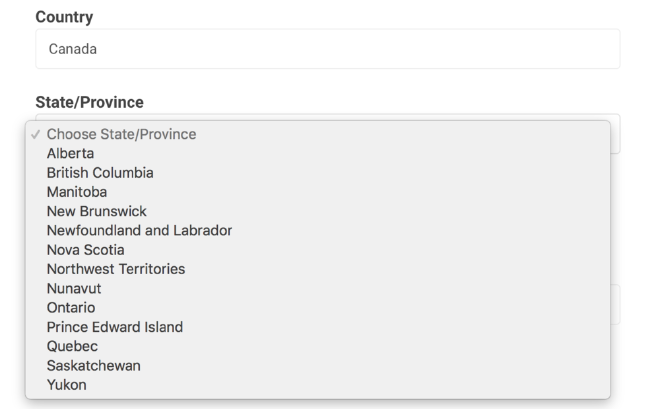
Suppose we have a form that asks the user for their country followed by the state or province (if applicable). We would want the country selection to determine the list of states/provinces that are displayed.

In this article, we’ll walk through code that populates a dropdown using sample JSON data containing Canadian province names and abbreviations.
Sample Data #
Our sample data can be found at MyJSON with the following contents:
[{
    "name": "Alberta",
    "abbreviation": "AB"
  },
  {
    "name": "British Columbia",
    "abbreviation": "BC"
  },
  {
    "name": "Manitoba",
    "abbreviation": "MB"
  },
  {
    "name": "New Brunswick",
    "abbreviation": "NB"
  },
  {
    "name": "Newfoundland and Labrador",
    "abbreviation": "NL"
  },
  {
    "name": "Nova Scotia",
    "abbreviation": "NS"
  },
  {
    "name": "Northwest Territories",
    "abbreviation": "NT"
  },
  {
    "name": "Nunavut",
    "abbreviation": "NU"
  },
  {
    "name": "Ontario",
    "abbreviation": "ON"
  },
  {
    "name": "Prince Edward Island",
    "abbreviation": "PE"
  },
  {
    "name": "Quebec",
    "abbreviation": "QC"
  },
  {
    "name": "Saskatchewan",
    "abbreviation": "SK"
  },
  {
    "name": "Yukon",
    "abbreviation": "YT"
  }
]
We’ll use the names for the contents of the <option> elements and the abbreviation for the values.
<option value="AB">Alberta</option>
Solutions #
The following solutions manipulate the DOM by populating an HTML select element we’ve defined on our page:
<select id="locality-dropdown" name="locality">
</select>
Our task can be divided into four steps:
- Target the dropdown
- Clear any existing options
- Insert a default option named “Choose State/Province” which is shown as a visual cue
- Insert an option for each province found in the JSON data
jQuery #
| |
- Line 1 targets the select element
- Line 3 clears any options in the element
- Lines 5-6 appends our default option
- Line 8 defines the URL where we can find our JSON data
- Lines 11-15 fetch the data and populate the options according to our requirements
Vanilla JavaScript #
Some developers avoid jQuery for performance reasons, so we’ve included two vanilla JavaScript solutions as well. This code is more verbose because we don’t have the getJSON method at our disposal.
Using XMLHttpRequest #
| |
- Line 1 targets the select element
- Line 2 clears any options in the element
- Lines 4-5 appends our default option
- Line 10 defines the URL where we can find our JSON data
- Lines 12-13 initializes the remote request
- Lines 19-24 creates an option element for each entry found and adds it to the select list
- Line 34 sends the remote request
Using Fetch #
| |